Since the early days of photography, artists, but also pranksters, have created artificial images in an attempt to make the invisible visible. Their motives: to share their imaginative and creative skills with the public, or, in the case of the pranksters, to get attention or make a quick buck on the back of the gullible. UFOs and the paranormal always provided a fertile field for hoaxers.
Already in the late 1940ies, soon after the first reports of strange flying objects hit the newspapers, fake pictures of flying saucers surfaced in the U.S. and subsequently in Europe and in other continents. Contrary to popular belief, UFO photos are extremely easy to fabricate. There is no need for a big amount of money or a crew of experts to accomplish this, all it takes is a bit of creativity and handiness.
We distinguish four techniques that were commonly used in the pre-digital era:
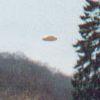
- Since metres-wide objects in the shape of a flying saucer are hard to come by (and even harder to get up in the air), it is more practical to use a scale model. The best results are obtained with hub caps, Frisbees and dinner plates, but any object with a round shape (from the buttons of your shirt to the lid of a soup pot) will do. Having chosen the right prop for your future UFO picture, you can either throw the thing in front of the camera (the slanted position of many objects in flying saucers pictures is often a give away), or suspend it from a thread that you attach to a stick or any long object that helps you bring the object at a certain distance from the camera (make sure to use a fine string, such as a fishing string, so that it will not show up in the picture). One more tip: wrapping your model in aluminium foil or spraying it with silver paint will make it reflect the light in such a way that it appears much further away from the camera than it really is. But even without the foil or the paint, the illusion of distance is soon created.
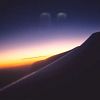
- A second technique is to take a photograph through a window. In that way, you can use reflections of lights inside the room to create the illusion of luminous objects hovering over the landscape. You can also take a piece of paper, cut out a desired UFO-shape, attach it to the window-pane and take pictures with your camera aimed at the landscape outside (the use of a flash can give the piece of paper the aspect of a self-luminous body). You can also use a (washable!) glass marker to simply draw a UFO on the window pane.
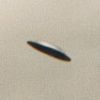
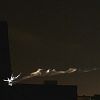
- Convincing UFO pictures can also be made by simultaneously projecting two different slides on a screen, one slide with a suitable landscape, a second slide with an object that can pass for a UFO. By rephotographing this composed scene, it is possible to obtain a very nice UFO shot. If you don't have two slide projectors, you can point a light torch towards the projected landscape and create your own luminous "disc", perhaps shake the torch a little so as to create the illusion of a fast moving object. A variant of this method is to draw, paint, or paste a disc or cigar-shaped object onto a printed picture and then photograph it again. The new picture will be less sharp than the original, but blurred and out of focus images are exactly what people expect from a photo taken during a dramatic UFO encounter.
- A fourth trick is known as "double exposure". It works as follows. Take a picture of a desired landscape, preferable with a good deal of dark sky in it. Then slowly turn the film rewind knob until you hear a click(the click means that you have rewound the film one full frame). Next, advance the film forward twice. This repositions the picture you took back into the exposure seat so that the picture you are about to take will appear overlapped onto your original shot (since the film was already exposed, only objects brighter than those captured in the first shot will be added to the image, hence the necessity to opt for a dark background sky). Now you are ready to take a picture of a bright coloured object that can feature as an alien spaceship. Be careful to frame it in such a way that it shows up in the sky portion of your first picture. Double exposures are always a bit of an experiment, but the result can be surprisingly convincing.
But why go through all this trouble now that digital photography has entered our lives? With image software being provided with every new pc, printer and camera, almost anyone can create a very realistic UFO photo these days. With digital photography too, there are different ways to proceed. The easiest and most popular ones are the following:
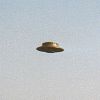
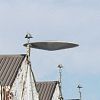
- Take a picture of an object or a building that has the shape of an alien spaceship (certain lamp posts and water towers make excellent material). Now use one of the tools from your photo editing program (the "clone stamp" for instance) to replace those parts that betray the subject's true nature with background sky. The advantage of this technique is that the now partially erased object or building initially formed an intrinsic part of the scenery. This means that all the shadows and highlights will be in the right places, making it very difficult for sceptics to unmask the deception.
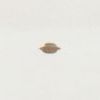
- You can also select a specific part of an existing image (such as the headlights of a car, an ashtray, or a toy in the shape of a UFO) and paste it into a picture with a suitable landscape scene.
- Or you can just paint a UFO into a picture. Eventually add spectacular light effects, using the wide variety of tools that most image editing programs provide.
A combination of traditional and digital techniques is sometimes used for the fabrication of fake videos. Realistic computer designed objects are easy to make these days, but not everyone is a good drawer and some pranksters still prefer to work with small models. These models are then filmed against an evenly lit pure background (preferably in a colour complementary to the colour of the model), after which the background is replaced with an image of a landscape. Trees and buildings can be copied and pasted from other images into the UFO image to create obstacles behind which the UFO moves.
Because pictures alone never constitute proof, it is important for an investigator to obtain a full narrative of the circumstances in which the image or images were shot. Contradictions between the story as told by the witness/photographer and the information that can be gleaned from his pictures, may shed a negative light on the credibility of the case. Especially an on-site investigation may help to determine the true nature of an object in a picture.
|
T r i c k e r y
Description
|
||||||||||||||||||||||||||||||||||||||||||||||||||||